Pages

Wednesday, October 26, 2011

Samsung Galaxy S II Battery Improvements With XXKI3

I previously went back to using DXKI2 because I associated a problem I had with the data speed with the XXKI3 ROM that I used. I’ve read a lot of comments about the improved battery life about the XXKI3 ROM and so I wanted to give it another try.


I went home straight from the office and prepped my laptop and my Samsung Galaxy S II for the update. First, I made sure both my laptop and my phone were fully charged. This made sure that in case of a power outage during the upgrade process both my phone and my laptop would remain powered. I can’t imagine what would happen should the laptop shut off in the middle of the upgrade and I don’t want to know either. Next step would include the backup process. I didn’t have any worries about my contacts and calendar because they were all backed up to Google. All I did was access Google’s website and made sure the latest entries I made where there. The only other information that I want to back up would be my text messages. Thankfully, I found this neat and easy to use application from the Market. The application is called SMS BACKUP and it backs up your text message to a memory card. It’s a one “tap” process and you have the option to schedule automatic backups if you wanted to. Finally, all my contacts, calendar, and messages were now surely backed up. I’m now ready to proceed with the update.


I started by first making sure that Kies is not in the system tray and that no Kies process is running in the background by ending Kies processes using the Task Manager. I also powered off the phone to prepare it for the download/upgrade mode later. I then opened Odin and placed the ROM files in the correct fields namely Phone, Code, and CSC. I booted my phone to upgrade mode by pressing the volume down, home, and power buttons simultaneously. Once I saw the prompt to enter upgrade mode, I pressed the volume up button to continue. Plugged my phone to my computer and once Odin detected my phone I then clicked the Start button to begin the update. For more information about the whole upgrade process, you can check out my previous blog post here. Additionally, you can go to my Flashing ROM Using Odin Basics 1 post for information on using Odin.


All went well and my phone is now running Android 2.3.5. The performance improvements are there but the main reason for me to upgrade was because of the improved battery life that the new ROM offered. I have been using my Samsung Galaxy S II for a few months now and I’m very consistent with my use. At the end of the day (from early morning ‘til I get home) I usually get between 30-37 percent of battery charge left. Now, as I’m typing this message I still got 48% battery charge left and my use of the phone hasn’t changed; I start the day with a fully charged phone. I’m going to continue observing it but I have a good feeling about it. The only thing I do not like about this version, which is a personal preference, is the absence of the over scroll bounce. It is now replaced by an over glow. Yuck!

Thursday, October 6, 2011

Flashing ROM Using Odin Basics 1

Flashing/upgrading your phone’s firmware can both be easy and difficult. It is easy because you have a lot of resources in the internet with instructions that you can follow. And, it can be difficult because not following those instructions could render your phone unusable or what people may call as “bricked”.


There are some advantages to knowing how to flash your phone. For one, you can flash your phone with a ROM file that is currently not available for your country or phone model. You also have a chance of trying a ROM ahead of others when a link to a leaked ROM is posted in the internet. So, to help you a bit in your thinking, I’m giving you some basics.


There are stock ROMs and custom ROMs available in the internet. Custom ROMs are usually based on a particular firmware version with modifications to allow you to do more and also to gain some performance improvements. One example would be Lite’ning ROM. I’m sticking to stock ROMs so that is what I’m going to discuss here.


First off, you can download stock ROMs from SamFirmware.com. You need to register to be able to see the download links. Most of the files are zipped and you need to extract them. After extracting you’ll notice that, again, some involve multiple files while some only consist of one. The single-file firmware simply just includes all those different files into one. However, the process of flashing does not change.
 
Photobucket


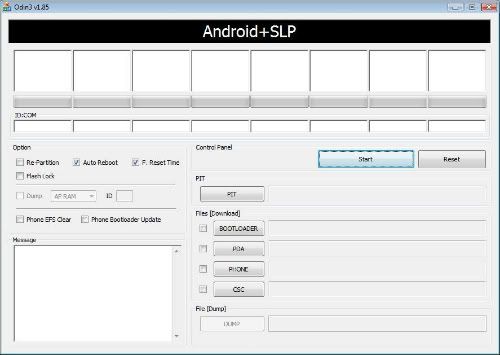
You also need a software called Odin3-v1.85. This is the software that you need to use to do the actual flashing. You can do a quick Google search to find the download link. Here's how Odin looks like:


For those firmwares with only a single file, you simply put that file into the PDA section of Odin and that’s it. For multiple files, it gets a bit tricky but not difficult. Here it goes:


The file with CODE in the name goes to the PDA section of Odin.
The file with CSC goes to CSC.
The file with MODEM goes to PHONE in Odin.


I guess that’s enough for now. I'll provide more information in future blog posts. You may want to check out the steps I took to flash my phone here: http://edmundsspace.blogspot.com/2011/10/flashing-samsung-galaxy-s-ii-to-dxki2.html


Returning To Android OS 2.3.3 DXKI2

I recently upgrade my Samsung Galaxy S2 to a leaked version of Android OS 2.3.5 (XXKI3). You can Click here if you want to check it out. There were a few things I liked about the new firmware and a couple of things I disliked. Among the good things to consider would be the noticeably faster overall system response. One thing I disliked, but could live with, was the over scroll glow that replaced the original bounce effect. I think this was due to Apple’s suit (RIP Steve Jobs). Anyway, I had a problem where our CSC which is GLB was not available for the ROM file I downloaded. I’m not sure if it had anything to do with it but my phone constantly showed only an E in areas where I originally had a 3G or H signal (e.g. my room). Also, the performance improvements weren’t enough “for me” to warrant upgrading to this leaked version so I decided to go back to DXKI2. I think I’d wait until we get an official update.


In case you were wondering where to get XXKI3, you can get it from here (it is a 282 MB file download): http://hotfile.com/dl/130600047/b70801e/I9100XXKI3.rar.html


Wednesday, October 5, 2011

Upgrading Samsung Galaxy S II To XXKI3 Firmware

After a successful firmware update to DXKI2 here, I must have been addicted to flashing. I can’t stop thinking which firmware to try. Custom ROMs where out though. I wanted to stick to the latest stock (official/leaked) firmware. I read over at XDA that 2.3.5 (XXKI3) was out. I checked out the comments over various sources in the internet and most of them point to a better battery charge life. Most of them also note improvements in performance. And so I went to try it out.


I went to my favourite source of stock firmware which is www.samfirmware.com and downloaded version XXKI3. After the download was complete I followed the same upgrade instructions as with my previous blog post. You can refer to it here:

http://edmundsspace.blogspot.com/2011/10/flashing-samsung-galaxy-s-ii-to-dxki2.html


After the update I noticed the performance improvements right away. Tapping on the back button gives you an amazingly fast feedback. Various performance can also be noticed like navigating the screen. A few hours of use and one thing I dislike was the removal of the off scroll bounce. Instead, you now get a soft blue glow whenever you over scroll. I could have lived with the update except for a problem I have with the internet connection via my carrier.


Where I originally get a 3G or H connection I can now only get an E. This is very important for me because I often use my phone’s data connection whenever I don’t have an available Wi-Fi connection. Checked CSC and it doesn't have GLB, XTE, or XTC. Hmm... I'm not really sure if it has something to do with the problem though. However, I'm thinking of flashing another CSC or just go back to DXKH2 or KI2. Have you guys tried out XXKI3? What are your experiences?

Tuesday, October 4, 2011

Flashing Samsung Galaxy S II To DXKI2 Firmware

I purchased the Samsung Galaxy S II (SHW-M250K) less than a month ago and I now have an itch to flash its firmware. I’ve read a lot of users reporting problems after flashing the firmware; some have even reported bricking their devices. This scared me a lot but the itch to upgrade is still there. So, I put a lot of time (make it a few days) into it to research about which firmware to flash to and how to go about doing the actual flashing. I’m what you would call a noob when it comes to flashing roms and this will be my first time.


Strangely, my phone originally came with what I think is the latest Android version which is 2.3.5. However, it is a Korean firmware and I would rather install one that is based on my locale Philippines. I searched and I saw the latest for our country is version DXKI2. I didn’t want to install a modified version of the ROM so I went to samfirware to download.


In preparation for the actual flashing, I downloaded and installed the latest version of Kies. This is required so as to install the necessary drivers for the Galaxy S II to be recognized by the computer. After installing Kies, you simply have to connect the phone to the computer and allow the necessary drivers to automatically install. That’s it for this part.


This time, I’m now ready to proceed with flashing my phone. Before you begin, I suggest that you fully charge your phone.


Step 1: Downloaded Odin3-v1.85. You can simply do a Google search for this one.
Step 2: Went to www.samfirmware.com and registered so I can download a stock ROM.
Step 3: Downloaded ROM DXKI2.
Step 4: Phone managed to charge to 100% while waiting for the download to finish. We’ve got a slow internet connection downloading at a mere 50 Kb/s.
Step 5: Went to SETTINGS > APPLICATIONS > DEVELOPMENT and checked the USB DEBUGGING option.
Step 6: Shutdown the phone by holding down the power button and choosing Power Off.
Step 7: Boot into Odin download mode by pressing the volume down + Home + Power Button at the same time.
Step 8: Kept on holding until I saw the warning to proceed to download mode. Pressed Volume up to confirm.
Step 9: On PC launched Odin and placed the downloaded tar file into the PDA section. This version of the firmware only contains one file.
Step 10: Connected phone to PC and saw it was detected 0:[COM19].
Step 11: Clicked START, waited, and got a SUCCESS prompt.


That means I’m all set and now my phone is running DXKI2 with Android version 2.3.3.


Note: I used a lot of sources over the internet to learn as much as I can about flashing my phone. However, this link really helped a lot.

Monday, October 3, 2011

Introduction

This is just a place for me to place some of my ideas or things that I’m currently up to so I don’t forget about it. I may also use it to share those ideas to others. This makes sharing ideas really simple; just point them to the blog link and they can read or follow themselves.